DIY Hair Bow Holder: A Mom’s Creative Solution
As a mom, I’ve found myself navigating through the adorable yet chaotic world of hair bows. My collection started small, a modest array of colors and styles for my little one. However, as any bow-enthusiast mom can attest, these collections have a way of growing—fast. Before I knew it, I was in deep, surrounded by bows of every imaginable type. It was time for a creative solution.
The Birth of the Bow Holder
In the spirit of nesting and preparation, I crafted a hair bow holder during my pregnancy. It was perfect for our then-modest collection. But as the collection expanded, so did the need for more storage solutions. I improvised with command hooks and thin wire on the back of her door, adding tiny clothespins for easy bow hanging. It’s a system that’s grown with us, and I promise to share an update on this setup soon.
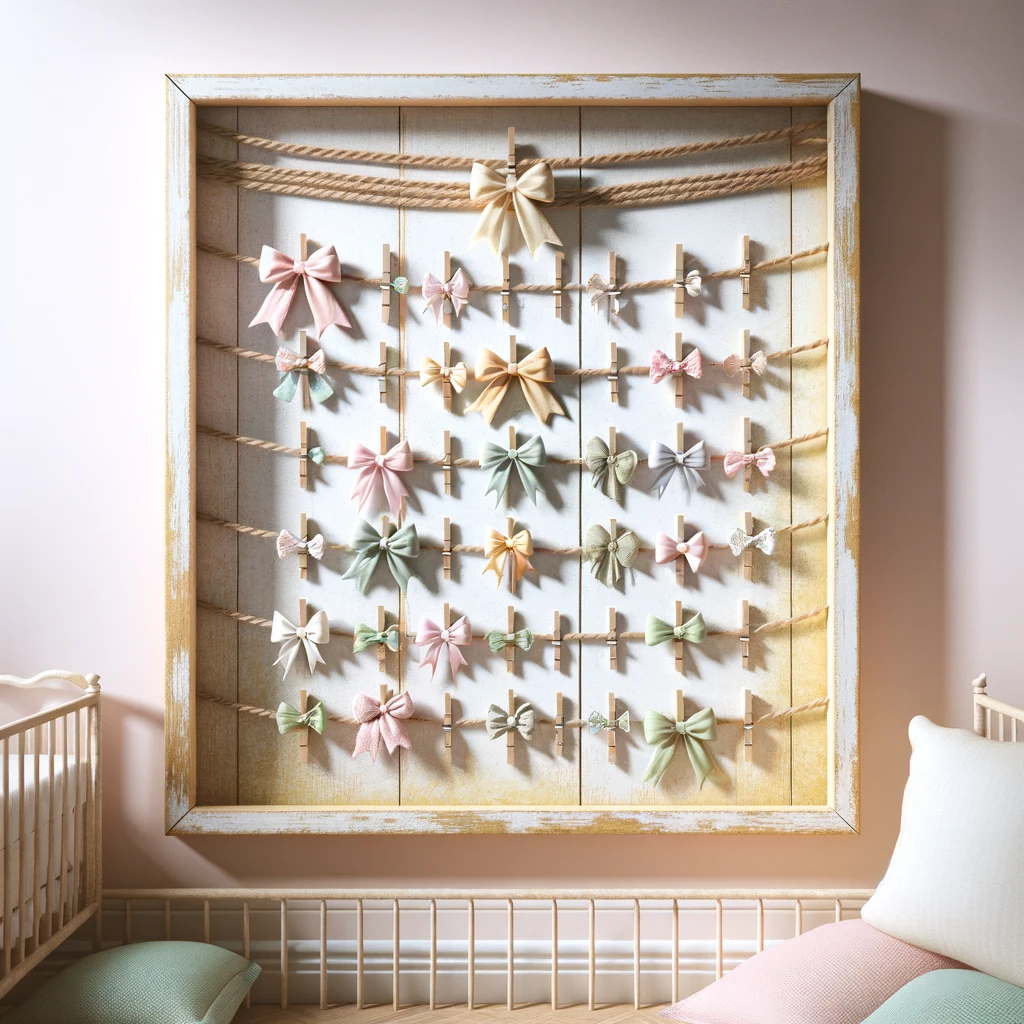
For the ‘Skinny’ Bows and Clips
Meanwhile, let’s talk about the original bow holder, especially designed for those ‘skinny’ bows and clips that are too cute to tuck away. Here’s how I did it:
- Finding the Perfect Frame: I stumbled upon a distressed wooden frame at Walmart for about $8, complete with strings for hanging. This find made the project incredibly straightforward and budget-friendly.
- Yarn Magic: With hot glue and yarn, I transformed the back of the frame into a bow-hanging haven. The yarn was glued in various patterns to accommodate bows with alligator clips or barrettes. This part of the project allows for creativity and customization based on your collection’s needs.
- Screw Hooks for Extra Storage: I bought a box of white screw hooks and, with a bit of manual labor (yes, it was a bit of a hand workout), screwed them into the frame one by one. This step is customizable; add as many or as few hooks as you need.
Personalizing Your Bow Holder
The beauty of this DIY project is in the personalization. Consider these ideas to make your bow holder uniquely yours:
- Paint the Frame: Match the frame to your nursery or child’s room decor by painting it in a coordinating color.
- Add a Personal Touch: Wooden letters spelling out your baby’s name can add a charming personal touch to the bow holder.
- Play with Yarn Colors and Patterns: Don’t hesitate to experiment with different yarn colors and gluing patterns. It’s all about finding what works best for you and your space.
Why It Works for Me
This DIY hair bow holder not only solved my bow storage problem but also added a cute decorative element to my daughter’s room. It’s a practical display that keeps her bows organized and easily accessible, making morning routines a little smoother.
Creating this bow holder was a fun, easy project that brought a bit of order to the delightful chaos of mom life. It’s a testament to the fact that with a little creativity (and a lot of bows), we can find joy and functionality in the everyday. So, to my fellow bow-collecting moms, here’s to embracing our “demons” with open arms and a hot glue gun. Happy crafting!